Monday, August 20, 2018

Anniversary card

Hello and welcome, thanks for stopping by! It has been a while since my last post, my apologies, but summer got really busy. Anyway I am back with another card idea for you folks...hopefully you'll like it.

Today happens to be our wedding anniversary...my husband and I are celebrating 8 wonderful years of marriage! Time flies when you're having fun! Anyway of course I had to make a card for him, and as I've mentioned before, I am not really good with masculine-themed cards. So I drew inspiration from a beautiful picture on our work e-mail program. Here it is...
 I thought the colors were just so brilliant! And being as it is nature, it is kinda neutral. So here is my card version of it...

This card was easy to make. I just sponged all my colors to replicate the picture. I used Rich Razzleberry, Blackberry Bliss, Night of Navy, So Saffron and Grapefruit Grove ink pads. Then I just drew the horizon and 'mountains' with my black marker before stamping my tree from my fave set Rooted in Nature. The tree kinda blended in with the black mountains in the horizon, so I decided to put some random highlights using my white pen. 

The sentiment is from the stamp set Beautiful Bouquetwhite-heat embossed on a die-cut piece of black cardstock using a die from the Petals and More thinlits set. This was then just adhered using some dimensionals for a bit of interest. I wanted so much to add more embellishments, but my husband literally hates any bling on cards, so I had to restrain myself. I thought simpler is better (for this project anyways :) I couldn't resist adding a bit of Wink of Stella though!

I just layered this on a Basic Black cardstock and then adhered the whole piece onto a Very Vanilla card base. And that is my project for today! Once again thank you for dropping by and I hope to see you next time! 

Thursday, August 02, 2018

International Highlights Winners Blog Hop: Travel


A few weeks ago I joined Kylie's International Blog Highlights for the first time, and surprisingly I made it to top four! Yay!!! So I wanna say a huge thank you to everyone who voted for my card, you guys rock! 

So as part of the top ten of the Blog Highlights, I get to participate in a blog hop with Kylie and all the very talented winners. And for this blog hop, we will have the same theme as before...travel. So let's have some fun!

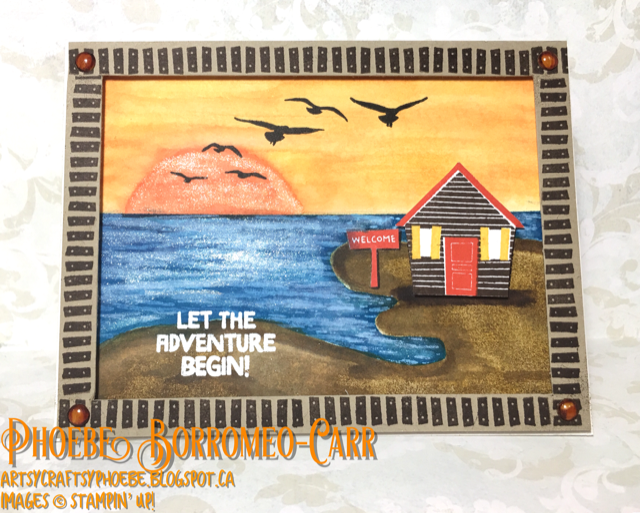
This project took me so little time to make...from concept board right to production especially since I didn't have that much spare time to craft right now. We are going on holidays and my mind is already dreaming of the lake...hence my idea for this card. Here's what I came up with:
 
To make this card I started with a Thick Whisper White cardstock and drew my beach area and horizon. Then starting with the sky, I sponged the top half of the horizon with Daffodil Delight and Calypso Coral. I just wanted a mixture of colors here, nothing precise since I will be smoothing out the colors with my Aqua Painter later on. I also added a huge sunset off to the side using my Calypso Coral. 
Next I started working on my beach area. I painted all over it with Sahara Sand ink, then added some Soft Suede for shading. I also tried giving it a 'sandy' effect by inking my sponge and then dabbing it onto my piece. This gave it a little bit of texture.
After my sky and beach were done, it was time to work on the water. I used some of my Magic Cover to trace my beach area and cut it out to use as a mask. I also covered up my sky before sponging all the exposed area with Pacific Point. Then for the waves I used the wave stamp from High Tide and stamped it with my Craft ink. Almost done!
Once everything was dry, I stamped my sentiment with Versamark ink right on the beach using a stamp from the Treehouse Adventures set and then White heat-embossed it. My lakefront cabin was from the same set, stamped on a scrap piece of Whisper White cardstock using Early Espresso, Poppy Parade and Daffodil Delight ink pads. I also stamped the welcome sign using Poppy Parade, then cut out my pieces to adhere to my art piece using dimensionals. I also stamped the birds in flight from the High Tide set using black ink.
Finally I created a frame for my art piece using a piece of Crumb Cake cardstock and the ladder stamp from the same Treehouse Adventures set stamped in Early Espresso. I adhered this frame using some of our foam adhesive strips. And of course I had to have some shimmer somehow so I added Wink of Stella to my water and the sun. Then it was just a matter of sticking this whole piece onto a Very Vanilla card base. And that is my card, pretty simple to make!

I hope you enjoyed my project for this blog hop. I wish I could make it better somehow but I am simply on vacation mode already! Do keep hopping along and see what the other very talented winners have created. Cheers to crafting and to holidays! 

Saturday, July 28, 2018

Ink & Share Blog Hop: Masculine theme

I have always found creating cards for men a bit daunting. One, because I love flowers and colors and sparkles...not exactly manly things. Two, because I just don't know what to create and how to embellish it. And lastly, because I simply do not own alot of stamp sets that scream 'masculine'. True, I can always use nature sets as they are mostly neutral, however I wanted to step outside of my comfort zone and explore and try to create something different. Needless to say, this month's Ink & Share blog hop is quite a challenge for me...luckily for me, I love a good ol' challenge!

For my project, I wanted to use my Country Livin' set. I got this set awhile ago but never actually got around to using it! This seems perfect for our blog hop's theme this month. And because I don't make alot of masculine cards, I decided to further challenge myself and create an interactive card this time around. I wanted my truck to move, so I designed this card...my take on the double slider card. 
Here's a video tutorial of how I created this card. I apologize for the lighting near the end, my camera was on lock mode and didn't adjust to the changing light conditions outside! Lesson learned haha. 

PRODUCTS USED:
Well I hope you enjoyed my contribution to our blog hop this month and thank you so much for stopping by! Do continue down the list of awesome crafters for more inspiration on masculine projects, just keep pressing the Next button. Happy crafting!


Thursday, July 26, 2018

Sweet Little Birthday card

I had to make a card for a co-worker's birthday, so I created this sweet little card for such a sweet and thoughtful person! I sure hope she likes it.
I started by sponging a piece of Whisper White cardstock with Flirty Flamingo, Coastal Cabana and So Saffron. Nothing precise, just a quick transfer of color. Then to help blend it all out, I sprayed it generously with good old water. This made the colors soften a bit. 
Once completely dry I started with my heat embossing. I used the cute flowers from the stamp set HedgeHugs, one of the sets that I haven't used in a while! I stamped the images using Versamark ink and then silver heat-embossed them. It looks like such a cute DSP don't ya think?!
I then cut out the center with a die from the Layering Circles Framelits, and also a scalloped piece on a piece of So Saffron cardstock for the frame. I layered my art piece on top of a So Saffron mat with the center cut out, and then this was then adhered to my Whisper White card base. Finally I stamped my sentiment from the Special Celebrations set using my Flirty Flamingo ink pad.

For embellishments I used the bird from the beautiful Petal Palette stamp set and stamped it in Gray Granite. I die-cut it using the coordinating die from the Petals & More Thinlits, and also the leaves on a piece of Shaded Spruce cardstock. Finally I added a bow using our Silver Baker's Twine

And that is my card for today. Thanks for dropping by and I hope to see you next time! Happy crafting!


Friday, July 20, 2018

Delightfully Detailed Specialty Paper and Brushos 2-for-1 card

Today I found myself playing with my beautiful Delightfully Detailed laser-cut paper. This specialty paper is simply gorgeous! Add these to any project and it instantly transforms it into a wow-project.
Now of course I had to play with my Brushos as well! So I trimmed up a piece of my specialty paper so that I can use this as a stencil for my Brushos. Because I will be saturating my paper quite heavily, I opted to use a piece of Thick Whisper White cardstock for my art piece. Here's a short video of what I did.
And to turn these into cards, I kept it simple. I trimmed my painted card background piece and layered it on top of Whisper White cardstock before adhering to my Real Red card base (A2 size). My sentiment is from the set Detailed with Love, which I white heat-embossed on a die-cut piece of Real Red cardstock using a die from Petals & More Thinlits. And finally for embellishment I just added some Rhinestone jewels.
Of course being a hoarder, I can't bear to throw away my beautiful laser cut paper that I used as a stencil! I just had to use it a well! So I just added a little more color onto it with my Brushos to make the colors pop even more. My paper was curling up after drying, so I just sandwiched it inside a piece of copy paper and ran it through my Big Shot to flatten it. This made it easier for me to glue it down onto my Basic Black cardstock. I then layered this onto a piece of Real Red, then finally onto my Whisper White card base.

For my sentiment on this card I chose a stamp from the set Floral Frames, which I white heat-embossed on a die-cut piece of Real Red cardstock using a die from Rose Garden Thinlits. I then added some Rhinestone jewels again for a little bit of embellishment.

And that is my project for today...I hope you enjoyed them! Cheers to more experimenting, crafting and creating! :)


Tuesday, July 10, 2018

Travel & Explore

Hello and welcome! Today I am participating in Kylie Bertucci's International Blog Highlight for the very first time...eek! It is a monthly challenge, and the top ten winners will get to be part of an international blog hop so feel free to vote for my project! :)  This month the theme is Travel...how fun! I can feel the creative juices flowing! Haha.

Here's what I came up with...
For my project I wanted to create a background using Brushos. I just could not play with these enough...I think I'm addicted! I ended up using all the colors, first creating a wash of the Yellow with my Aqua Painter and then creating my shades using all the other colors. Super easy to make a pretty background with these because I found that Brushos are very forgiving and a lot of fun to use!
Once my background was dry enough, it was time for some stamping fun. I used the beautiful tree images from my favorite stamp sets Rooted in Nature and Lovely as a Tree. The cyclist is from Enjoy Life, another gorgeous set. And the birds are from the set High Tide.
Finally I custom-made my sentiment using the Make a Difference stamp set, and then layered it on top of some Gold foil sheet. To assemble my card, I just layered my trimmed art piece on top of a Basic Black cardstock before adhering to my Very Vanilla card base.

And that is my card for today! Doesn't it make you want to go out and explore? Anyway thank you again for stopping by today and don't forget to vote for me! Happy crafting!!!
http://www.craftykylie.com/2018/07/kylies-international-blog-highlights.html


Saturday, July 07, 2018

Beautiful Preggy You :)

I have been asked recently to make a card for one of my co-workers who is expecting a baby boy in a few weeks. I of course said yes, thinking that I have the perfect stamp set for that...the Wonderful Moments set! Well, imagine my surprise when I found out that I hadn't actually ordered that one yet...that set was on my wish list after all! So what was I to do?! Luckily I owned the gorgeous set Beautiful You, and with just a little bit of tweaking, I was able to make it work! 

Here's my super simple card...I hope she likes it!
For the pregnant look I just wiped the ink off her tummy before stamping my image. This enabled me to draw in her pregnant tummy. I colored my image using my Watercolor Pencils and AquaPainters and then used my Stitched Framelits to cut my oval piece. I also cut up strips of my Springtime Foils DSP (retired SAB item) and sponged them in Pool Party ink to match my cardstock. Finally for embellishment I just added some sequins with some Rhinestone jewels in the middle.

And that is my simple card for today. With just a little bit of imagination, the possibilities are endless! Thanks for stopping by today and I hope to see you next time. Happy crafting!