Saturday, October 13, 2018

Purple Blizzard

It is currently snowing outside...how sad is that?! It is mid-October, supposedly Fall, but apparently that season doesn't exist anymore. We jumped from a smokey summer, straight into winter it seems. Owell, more time for me to play in my craft room I guess! 

So to match the weather outside, I decided to play with my Blizzard thinlits die. I love pretty snowflakes, and this big die is jam-packed with 'em! Here's what I came up with...
I started with my background using my F block, Berry Burst and Pacific Point inks, and my spray bottle. I just dabbed bits of my ink on my big block, sprayed it generously with water, and then applied my piece of Whisper White cardstock right on top of it. This makes for a super quick and easy background piece. I then used my heat gun to dry off my piece.
Next I die cut this piece using my Blizzard die, and saved all the cut up snowflakes for another card. I sprayed it with my shimmer spray which consists of a few drops of Frost White shimmer paint and water in a spray bottle. Then I trimmed my blizzard piece to        3 7/8" x 5 1/8" and layered it on a piece of Basic Gray cardstock that is 4" x 5 1/4". This whole piece was then layered again on a 4 1/8" x 5 3/8" piece of Gorgeous Grape cardstock before adhering it on an A2 size Whisper White card base.

My sentiment is from the gorgeous Snow is Glistening stamp set which I heat embossed in white and silver (I couldn't decide which one was better) on a strip of Gorgeous Grape. For embellishment I die-cut a snowflake using the Snowfall Thinlits die on a silver glimmer paper. Finally I added rhinestone basic jewels in the center of my snowflakes for a little accent. 
Now I couldn't very well waste my beautiful cut-up snowflakes so I decided to use them up in another card. I adhered the snowflakes on a Basic Gray cardstock that is 4 1/8" x 5 3/8". Then I sprayed it with my shimmer spray before adhering it to my Whisper White card base. I used the same sentiment and again added rhinestones to the centers of the snowflakes.
And those are my cards for today! Hopefully this gave you a bit of inspiration in using those beautiful dies. Thank you for stopping by and I hope to see you next time! Happy crafting!

Wednesday, October 10, 2018

Snow Is Glistening

My pre-order just arrived and I just HAD to play! I didn't have much time to play lately as I was finishing up an order of 60 different cards for all occasions, and boy was that ever a big task. But I am finally done, and now it's time to play! 

I pre-ordered the beautiful stamp sets and thinlits from the Snowflake Showcase, and wow, they are all absolutely amazing! 
So right away I dove into my new sets and played with the Snow is Glistening stamp set...just gorgeous! I made this card using just this one stamp set...don't you just love those all-around sets?! I sure do!
I started by stamping my snowflake border stamp all around my piece of Night of Navy cardstock (5 1/4" x 4") in Versamark ink. This was then covered in gold embossing powder and heat-set. 
Then I cut my gold foil sheet to 5 1/2" x 4 1/4" and trimmed the inside to use as my mat for the tree (3" x 4 1/4"). My Whisper White piece is 2 3/4" x 4", with the tree stamped onto it using Night of Navy ink pad. And my sentiment was gold heat-embossed onto a double piece of vellum to make it stand out more against the tree. 
Finally the star on top of the tree was from a retired metallic sequin assortment. And that is my simple card for today. I think this will be a fantastic project for a make and take...simple, easy, using minimal supplies but producing maximum impact!

Thank you for stopping by today and hopefully now that I have finished the big order, I can have more time to play and do more blog posts. See ya next time!

Wednesday, September 12, 2018

Table Assignments

A few weeks ago I had to pick up my Stampin' Up order from a new UPS store by my house. I've never been to this place before, but this pickup ended up to be so serendipitous. I started chatting with the owner of the shop and she asked me what Stampin' Up was, so I gladly told her! Well next thing I know she was commissioning me to make the table assignments for her daughter's big 18th birthday celebration! Happy dance! 

This party is huge...a girl's 18th birthday (or debut) in the Philippines is kinda like a Sweet 16. It's a huge milestone celebrated extravagantly. And so for the table assignments, I created this:
 Since there was gonna be 21 tables, I pre-cut all of my items so that I can save time assembling everything. I used my Botanical Builder framelits on red and gold foil sheet for the flowers. The leaves are cut from the same foil sheets using the Sprig punch. I then used my Stitched Seasons framelit dies to create the gold frame, and used my Swirls & Curls embossing folder to create the texture. This was then just sponged with Cherry Cobbler and Basic Black inks, before spritzing it with my shimmer spray which is created by mixing some Frost white shimmer paint and water. Her theme was Paris, so I had to create an Eiffel tower stencil and just lightly sponged it with my Blushing Bride ink pad.
 And this was my final product. It was a bit tight trying to fit everything in the frame, but it worked out okay! I hope they have a lovely celebration!
Thanks for stopping by and hope as always, hope to see ya next time! Happy crafting!

Thursday, September 06, 2018

the Animal card

I was asked to make a card for my co-worker's kid sister. She's five and she'll be undergoing heart surgery, and to help cheer her up we're giving her a card with some words of encouragement. So of course I wanted to create something special for her! This is what I came up with...

I decided to make her a card full of cute animals..something fun! Luckily, we have a whole bunch of stamp sets of these cute critters...Bella and Friends, Hedgehugs, Animal Outing, Party Pandas, Bird Banter, This Little Piggy, A Little Wild, and We Must Celebrate. I used both current and retired sets, stamped all my images, colored them in, then cut them out. Then I created a collage with these cute animals. My background was sponged in four different colors, and my sentiment is from the Healing Hugs stamp set.

And that is today's card. I really hope she'll like it and help her through her recovery! Thanks for stopping by and see ya next time!

Monday, August 20, 2018

Anniversary card

Hello and welcome, thanks for stopping by! It has been a while since my last post, my apologies, but summer got really busy. Anyway I am back with another card idea for you folks...hopefully you'll like it.

Today happens to be our wedding anniversary...my husband and I are celebrating 8 wonderful years of marriage! Time flies when you're having fun! Anyway of course I had to make a card for him, and as I've mentioned before, I am not really good with masculine-themed cards. So I drew inspiration from a beautiful picture on our work e-mail program. Here it is...
 I thought the colors were just so brilliant! And being as it is nature, it is kinda neutral. So here is my card version of it...

This card was easy to make. I just sponged all my colors to replicate the picture. I used Rich Razzleberry, Blackberry Bliss, Night of Navy, So Saffron and Grapefruit Grove ink pads. Then I just drew the horizon and 'mountains' with my black marker before stamping my tree from my fave set Rooted in Nature. The tree kinda blended in with the black mountains in the horizon, so I decided to put some random highlights using my white pen. 

The sentiment is from the stamp set Beautiful Bouquetwhite-heat embossed on a die-cut piece of black cardstock using a die from the Petals and More thinlits set. This was then just adhered using some dimensionals for a bit of interest. I wanted so much to add more embellishments, but my husband literally hates any bling on cards, so I had to restrain myself. I thought simpler is better (for this project anyways :) I couldn't resist adding a bit of Wink of Stella though!

I just layered this on a Basic Black cardstock and then adhered the whole piece onto a Very Vanilla card base. And that is my project for today! Once again thank you for dropping by and I hope to see you next time! 

Thursday, August 02, 2018

International Highlights Winners Blog Hop: Travel


A few weeks ago I joined Kylie's International Blog Highlights for the first time, and surprisingly I made it to top four! Yay!!! So I wanna say a huge thank you to everyone who voted for my card, you guys rock! 

So as part of the top ten of the Blog Highlights, I get to participate in a blog hop with Kylie and all the very talented winners. And for this blog hop, we will have the same theme as before...travel. So let's have some fun!

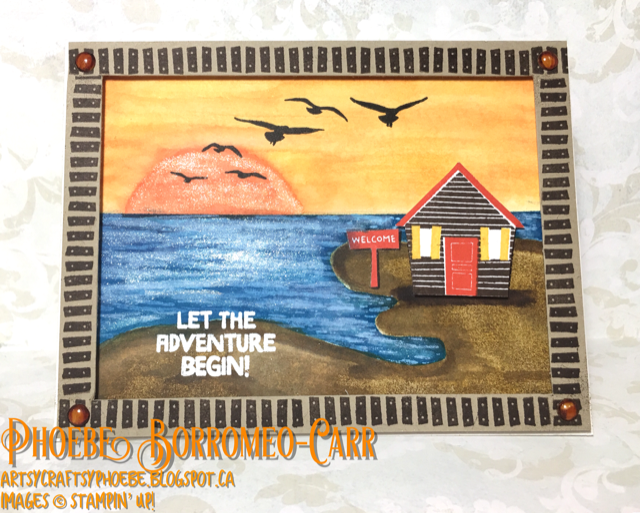
This project took me so little time to make...from concept board right to production especially since I didn't have that much spare time to craft right now. We are going on holidays and my mind is already dreaming of the lake...hence my idea for this card. Here's what I came up with:
 
To make this card I started with a Thick Whisper White cardstock and drew my beach area and horizon. Then starting with the sky, I sponged the top half of the horizon with Daffodil Delight and Calypso Coral. I just wanted a mixture of colors here, nothing precise since I will be smoothing out the colors with my Aqua Painter later on. I also added a huge sunset off to the side using my Calypso Coral. 
Next I started working on my beach area. I painted all over it with Sahara Sand ink, then added some Soft Suede for shading. I also tried giving it a 'sandy' effect by inking my sponge and then dabbing it onto my piece. This gave it a little bit of texture.
After my sky and beach were done, it was time to work on the water. I used some of my Magic Cover to trace my beach area and cut it out to use as a mask. I also covered up my sky before sponging all the exposed area with Pacific Point. Then for the waves I used the wave stamp from High Tide and stamped it with my Craft ink. Almost done!
Once everything was dry, I stamped my sentiment with Versamark ink right on the beach using a stamp from the Treehouse Adventures set and then White heat-embossed it. My lakefront cabin was from the same set, stamped on a scrap piece of Whisper White cardstock using Early Espresso, Poppy Parade and Daffodil Delight ink pads. I also stamped the welcome sign using Poppy Parade, then cut out my pieces to adhere to my art piece using dimensionals. I also stamped the birds in flight from the High Tide set using black ink.
Finally I created a frame for my art piece using a piece of Crumb Cake cardstock and the ladder stamp from the same Treehouse Adventures set stamped in Early Espresso. I adhered this frame using some of our foam adhesive strips. And of course I had to have some shimmer somehow so I added Wink of Stella to my water and the sun. Then it was just a matter of sticking this whole piece onto a Very Vanilla card base. And that is my card, pretty simple to make!

I hope you enjoyed my project for this blog hop. I wish I could make it better somehow but I am simply on vacation mode already! Do keep hopping along and see what the other very talented winners have created. Cheers to crafting and to holidays! 

Saturday, July 28, 2018

Ink & Share Blog Hop: Masculine theme

I have always found creating cards for men a bit daunting. One, because I love flowers and colors and sparkles...not exactly manly things. Two, because I just don't know what to create and how to embellish it. And lastly, because I simply do not own alot of stamp sets that scream 'masculine'. True, I can always use nature sets as they are mostly neutral, however I wanted to step outside of my comfort zone and explore and try to create something different. Needless to say, this month's Ink & Share blog hop is quite a challenge for me...luckily for me, I love a good ol' challenge!

For my project, I wanted to use my Country Livin' set. I got this set awhile ago but never actually got around to using it! This seems perfect for our blog hop's theme this month. And because I don't make alot of masculine cards, I decided to further challenge myself and create an interactive card this time around. I wanted my truck to move, so I designed this card...my take on the double slider card. 
Here's a video tutorial of how I created this card. I apologize for the lighting near the end, my camera was on lock mode and didn't adjust to the changing light conditions outside! Lesson learned haha. 

PRODUCTS USED:
Well I hope you enjoyed my contribution to our blog hop this month and thank you so much for stopping by! Do continue down the list of awesome crafters for more inspiration on masculine projects, just keep pressing the Next button. Happy crafting!