Saturday, February 23, 2019

February Blog Hop: Sale-a-bration

Hello and welcome to this month's Ink.Stamp.Share blog hop. Today we are celebrating Sale-a-bration!!! What an awesome event for crafters this is because you get to choose free stuff from an array of absolutely beautiful SAB items for your qualifying purchase! Need more info on this awesome event? Just let me know and leave a comment below.

For my project I put together this card:

I used the Lasting Lily stamp set, my absolute favorite SAB item! This gorgeous set was a must-have for me, I couldn't wait to create something with it. The flowers are just stunning and with beautiful sentiments to match. And because this is a Distinktive set, your stamped images also have more depth to them. Just beautiful!
To make my card I started by stamping my flowers and leaves on a piece of Whisper White cardstock using Merry Merlot and Old Olive ink pads. After cutting my images I moved on to creating my background piece. I stuck a piece of DSP from the Botanical Butterfly DSP collection (another SAB item!) at the bottom of a piece of Basic Black cardstock (4" x 5 1/4"). Then I cut the center out using my Rectangle Stitched Framelits.
Next I added my layering pieces using another SAB item, the Lovely Lipstick Foil Sheets (unfortunately these are all sold-out now). After gluing my pieces together, it was just a matter of adding my lilies and leaves in the center, arranging it into a nice bouquet. Then I added my sentiment which was white heat-embossed on a strip of Basic Black cardstock, propping it up using some dimensionals.

I then added some embellishments using the Basic Rhinestone Jewels and yet another SAB item, a bow made from the Organdy ribbon. I also had to have some shimmer (of course!) so I added some Wink of Stella onto my lilies. The whole card front piece was then adhered to my Whisper White card base (A2 sized). 

And that is my project for today's blog hop...I hope y'all liked it. I really enjoyed playing with my SAB items, they're all just beautiful! Don't forget, Sale-a-bration only runs til the end of March, so you better act now if you want any of these freebies! 

Keep on hopping along with us and see the beautiful projects of the rest of the very talented team at Ink.Stamp.Share. Thanks for stopping by and happy crafting!

Roll Call List


Thursday, February 21, 2019

Puppy Love

I am a huge dog lover. And so when Stampin' Up! released another stamp set with dogs, I just had to buy it. Add to the bundle a dog punch and I'm in seventh heaven! :)

So today I got to play with the adorable Happy Tails bundle and made this simple card. 
To make my card I started with the star of the show, the dog! I stamped the outline of the dog in Memento Tuxedo Black ink, then white heat-embossed the spots. To color the dog I used my Pumpkin Pie and Crumb Cake ink pads and AquaPainter to start, then added some brown using my Early Espresso watercolor pencil for some shading. Cutting out my image was easy with the help of the coordinating Dog Builder Punch.

I cut the butterfly out from the Sale-a-bration item Botanical Butterfly DSP using the Butterfly Duet punch. I then glued down my dog and butterfly on a piece of Smoky Slate cardstock that I cut out using the Rectangle Stitched Framelits. (I trimmed my piece down to a smaller rectangle to fit my dog better.)

Next, the sentiment was white heat-embossed on a square piece of Night of Navy cardstock that I cut out using the Stitched Shapes Framelits. Then I just added a paw print with the sentiment piece, for fun!

To put my card together I used Smoky Slate (A2 sized) for my card base. I then added a layering piece of DSP from the Needlepoint Nook collection (4" x 5 1/4"). Next I wrapped some Silver Baker's Twine around my dog piece before adhering it onto my card. Finally my sentiment piece is added using dimensionals

And that is my super simple card for today, hope you liked it. My adorable dog Tayla was the inspiration behind this card. I didn't quite capture her likeness in this card, but close enough! :) Hope to see you next time and happy crafting!


Sunday, February 17, 2019

Colorful Butterflies

Hello and welcome. Today I got to play with the pretty butterflies from the Sale-a-bration item Botanical Butterfly DSP, and oh what a pretty collection of paper this is! Here's what I created...
I was inspired by this week's Global Design Project challenge 176...CASE the Designer. Steffi Helmschrott designed a gorgeous card with vibrant colored circles, and these are what inspired me in creating my card. 
I started by coloring my pretty butterflies using the colors of the rainbow. I don't own the Blends (yet), so I just used my ink pads and my Aqua Painter. For my colors I used the following: Real Red, Pumpkin Pie, Pineapple Punch, Granny Apple Green, Bermuda Bay, Gorgeous Grape and Blackberry Bliss. I also colored the centers of my butterflies using the Vegas Gold Shimmer Paint (unfortunately now retired), because butterflies need some sparkle of course! :) After coloring I used my Butterfly Duet punch to easily cut them out.
My mat layer is a piece of Basic Black cardstock (5 1/4" x 4") which I ran through my Big Shot with the Dot to Dot embossing folder. For additional interest I sponged it with the Vegas Gold shimmer paint to match my butterflies. My sentiment is from the Butterfly Gala stamp set, which I gold heat-embossed on a strip of Basic Black cardstock.

To put my card together, I adhered my mat layer onto my Basic Black A2 sized card base. Next I added my butterflies along the left side and my sentiment piece using dimensionals. And just like that, my card is done!
I just adore butterflies, I think they are just gorgeous! And I couldn't be happier that we have tons of pretty butterflies to play with from both the Occasions and Sale-a-bration catalogue. Thank you again for stopping by today, and see you next time! Happy crafting!

Sunday, February 03, 2019

Incredible Like You

Had a chance to play with more of my new stuff, so today I chose to play with the Incredible Like You stamp set and paired it with the Doily Builder Thinlits. This project was inspired by the Global Design Project sketch challenge for this week and Kylie Bertucci's International Blog Highlights as well, and here's what I created...

I started by stamping my images from the stamp set Incredible Like You on a piece of Whisper White cardstock and then cutting them out (I used my Scan N Cut for this but they're easy to fussy cut as well). I used Highland Heather, Call Me Clover and Mango Melody for my inks. I also stamped the stripes on a piece of Mango Melody cardstock that's 1" x 4 1/8" using Mango Melody ink pad for a tone on tone effect. I did the same for my background piece which is Soft Sea Foam cardstock (4 1/8" x 5 3/8") that I stamped with the Crackle Paint background stamp using Soft Sea Foam ink pad.

To put my card together I glued down my Mango Melody striped piece onto my background mat layer, then wrapped the Highland Heather Organdy ribbon (free with Sale-a-bration!) around it. I adhered this piece onto my Highland Heather A2 size card base before adding my other layers.

 Next I added a die-cut doily in Whisper White using the Doily Builder thinlit...this thinlit set is just gorgeous! Then it was just a matter of layering my cut-out stamped images on top of my doily using glue and dimensionals. Finally my sentiment is from the Well Said stamp set, stamped in my black Memento ink on a strip of Whisper White cardstock.

To finish off my card I just added a few iridescent sequins, and covered my flowers in Wink of Stella for some shimmer. And that is my finished card. I'm not gonna lie, I had a hard time making this card to try to meet both challenges, but I'm quite happy with the end result! Thank you for stopping by and don't forget to vote for my card at Kylie's International Blog Highlights! Happy crafting!


Tuesday, January 29, 2019

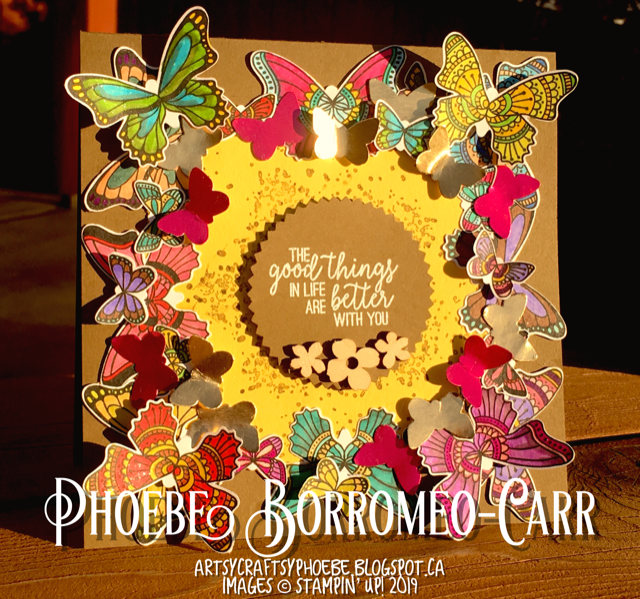
Butterfly Gala

Butterflies are just so pretty, don't ya think so? I have been wanting to play with my gorgeous Butterfly Gala bundle for quite some time, and today was the day for that! This is what I came up with...
 This card was pretty easy and fun to make. I started by stamping the butterflies on a piece of Whisper White cardstock using my Memento ink pad. Then comes the fun part...coloring them in! I used my alcohol markers for this and then topped them all with Wink of Stella for some shimmer.
Cutting my butterflies out was easy with the help of the coordinating Butterfly Duet punch. Next I had a piece of Daffodil Delight cardstock (5 1/4" x 5 1/4") and I covered it with a background stamp from the Artisan Textures stamp set in Soft Suede ink. Then I glued down my butterflies around the border of my cardstock, forming a frame. I decided to trim the excess yellow cardstock in my frame so that my butterflies lie against my Soft Suede card base instead, for more contrast. I also added small butterflies punched out from a Gold Foil Sheet and the SAB item Lovely Lipstick Foil Sheet.

My sentiment was white heat-embossed on a Starburst punched piece of Soft Suede, and mounted using dimensionals. Finally for a little bit of embellishment I added some Butterfly Elements, another SAB item.

And that is my card for today, I hope you liked it! Thanks for stopping by today and checking out my project, hopefully you got a bit of inspiration from these beautiful butterflies! And don't forget that Sale-a-bration is going on right now until the end of March, so if you want free goodies you better check it out. See ya next time!


Saturday, January 26, 2019

January Ink. Stamp. Share Blog Hop


Hello and thank you for joining us for our monthly blog hop here at Ink. Stamp. Share. This month's theme is the new Spring/Summer Catalogue...we'll have so much fun with all the new stuff. Let's get started!

For my project for this hop I decided to use the Wonderful Romance bundle. It is a gorgeous stamp set with an equally awesome coordinating die set, the Wonderful Floral Framelits. This is such a beautiful bundle for building a floral bouquet card...and the coordinating dies make this process easier. Here's what I came up with.
To make this card I started by stamping my images with my Memento ink pad on a scrap piece of Whisper White cardstock, then I clear heat-embossed them as well to prevent any bleeding when I colored them in. I used my alcohol markers to color my images, then I simply die-cut them using the coordinating dies. 
To build up my bouquet I die-cut more leaves in Lemon Lime Twist and Tranquil Tide cardstock, and the sprig in Crushed Curry cardstock. Next I had a piece of Fresh Fig cardstock (5 1/2" x 4 1/4") that I die-cut the sides of using the leaf border framelit. I first die-cut one side, flipped it over and did the other side. This piece was then layered on top of a Gold Foil sheet (4" x 5 1/2") before being added to my A2 sized Whisper White card base.

Then it was just a matter of arranging all my die-cuts on top of my card, building up my bouquet. My sentiment was gold-heat embossed on a circle piece of Whisper White cardstock (I used my 2" circle punch for this) and layered on a Starburst-punched piece of Gold foil sheet

And that is my card project for today, I hope you guys liked it as much as I did creating it! Keep hopping along with us and be inspired by the very creative projects of the Ink. Stamp. Share team. See ya next time and happy crafting!
January Roll Call


Thursday, January 17, 2019

January Simple Stamping Challenge

I don't know why, but lately I've been doing more and more simple stamping projects. There's just something about these simple cards...a minimalistic beauty. So today I share another one, my response to Stampin' Up's simple stamping challenge for January. For this challenge we are given Valentine's Day as our theme, and we are to create a card using just stamps, ink, a notecard and a punch. Here's what I came up with... 
Looks like a pretty Designer Series Paper, right?! I loved how easy it was to create this card, and how very little supplies I used as well. I started my simple card with a Whisper White card base (A2 size). I decided to use the Forever Lovely stamp set for this project, along with Lovely Lipstick, Old Olive and Gray Granite ink pads. I also opted to use the Pretty Label punch, and a couple of dimensionals. And that is literally all that I used for this card! 

Here's a short video on how I created this simple card...

With all the beautiful simple stamping projects out there, I hope they've inspired you to just get out your stamps and ink pads and just create something beautiful! You don't need much to make a pretty card, and the most important thing is to have fun with it!

Well thank you for stopping by and I hope you enjoyed this simple stamping card. Hope to see you next time!