Showing posts with label Artisan Textures. Show all posts

Tuesday, February 04, 2020

Vibrant Ombré Background

I have been wanting to play with my Peaceful Moments bundle for a while now, and today I finally got the opportunity to do so. I had it all pictured in my mind...a vibrant ombre background with my poppy die-cuts in black. So I set out to make my background piece...I started inking up my Whisper White cardstock piece using a brayer and my ink pads. I came up with a nice background piece, but not what I had in mind. The colors were too muted...not as striking as I wanted even with multiple layers of ink. Time for Plan B.

I thought to myself, why not just stamp my background? I'll get the color pay-off that I'm looking for and it's quick and easy. Win-win! So I searched through my vast collection of stamp sets until my Artisan Textures caught my eye. Perfect! Color and texture, I love it!

I just stamped repetitively in different shades to get the effect I wanted. I used Mango Melody, Terracotta Tile, Merry Merlot & Blackberry Bliss for my inks. I was so  happy with the end result that I had to make multiples! 

Here's a really short video on how I created my background:
Now wasn't that easy?!? Here are the cards that I made using these vibrant background pieces...I think they are just striking! I used my Poppy Moments Dies for some cards, using Basic Black cardstock and Copper Foil sheets for the accents. Some of my sentiments were from the Peaceful Moments and Sending You Thoughts stamp sets, heat-embossed with copper embossing powder to tie in with the other accents on my cards. And lastly for embellishment I added some of my Champagne Rhinestone Jewels.


This background piece is more muted and less textured compared to the rest because I sprayed it with lots and lots of water. It just depends on the effect that you are looking for, add as much or as little water as you like :)

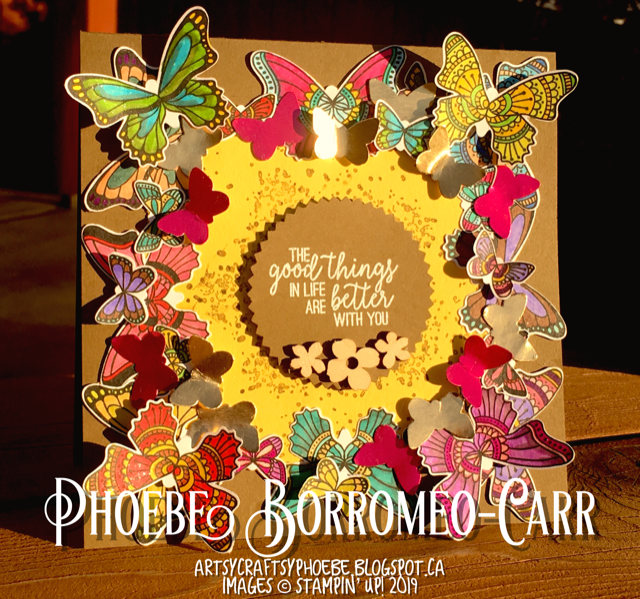
This card was made using my Butterfly Beauty Die, and the sentiment came from Dandelion Wishes stamp set. 
And lastly, I used my Springtime Impressions Die on this card, sentiment from Dandelion Wishes stamp set again on a punched out piece of Copper Foil using my Everyday Label Punch. I just lined the edges with a black permanent marker to add dimension. I also added a linen thread bow for embellishment.

And those are my cards for today, I hope you like them as much as I loved making them! I love this simple technique, I think I'll be using it lots with other color combinations. Thanks for stopping by and hope to see you next time! Happy crafting!

Tuesday, January 29, 2019

Butterfly Gala

Butterflies are just so pretty, don't ya think so? I have been wanting to play with my gorgeous Butterfly Gala bundle for quite some time, and today was the day for that! This is what I came up with...
 This card was pretty easy and fun to make. I started by stamping the butterflies on a piece of Whisper White cardstock using my Memento ink pad. Then comes the fun part...coloring them in! I used my alcohol markers for this and then topped them all with Wink of Stella for some shimmer.
Cutting my butterflies out was easy with the help of the coordinating Butterfly Duet punch. Next I had a piece of Daffodil Delight cardstock (5 1/4" x 5 1/4") and I covered it with a background stamp from the Artisan Textures stamp set in Soft Suede ink. Then I glued down my butterflies around the border of my cardstock, forming a frame. I decided to trim the excess yellow cardstock in my frame so that my butterflies lie against my Soft Suede card base instead, for more contrast. I also added small butterflies punched out from a Gold Foil Sheet and the SAB item Lovely Lipstick Foil Sheet.

My sentiment was white heat-embossed on a Starburst punched piece of Soft Suede, and mounted using dimensionals. Finally for a little bit of embellishment I added some Butterfly Elements, another SAB item.

And that is my card for today, I hope you liked it! Thanks for stopping by today and checking out my project, hopefully you got a bit of inspiration from these beautiful butterflies! And don't forget that Sale-a-bration is going on right now until the end of March, so if you want free goodies you better check it out. See ya next time!


Tuesday, May 15, 2018

4 Cards in 1

     It has been awhile since my last post...we had a family emergency. Tough times for sure, heaven gained another beautiful angel. Rest in peace lola!

     Anyway to make up for my 'slacking', I did a 4-card-1-video tutorial. These are more of my OnStage display board samples, with the same theme focusing on the Chase Your Dreams Framelits, Artisan Textures and Swirly Frames stamp sets. Hopefully these projects will inspire you and give you some ideas on ways to use these beautiful items. You don't wanna miss out on these, trust me!


Here are my finished cards:


Thank you so much for stopping by today and I hope to see you next time! I wish you a lovely day :)


Tuesday, April 17, 2018

3D Swirly Frames

     I am not much of a scrapbooker...it just isn't my thing. I am always so envious of these talented people who can easily make a scrapbook page with no effort and it looks amazing. For me first of all, I don't print my pictures...they're all just stored on my devices. Then there's that huge space to fill! I have a thing about blank spaces...I don't like them for some reason. So to try and make use of all that 12x12 space is very intimidating to me. And lastly, thinking of a layout is another factor for  me. 
     
     Having said all that, I had to make a scrapbook page for my Display board at OnStage, and believe me I was not too keen about that. How am I supposed to feature the products I received on a scrapbook page?! So I racked my brain trying to come up with something, until I had a eureka moment. Why not just do a simple water-colored background with my stamps? And so that's what I did!

     I started with a Cherry Cobbler 12x12 sheet, then got out my new Swirly Frames stamp set (p.137) and again used the circles. I stamped them on a diagonal with my Versamark pad and then gold heat-embossed them. Then I randomly stamped the splatter from the Artisan Textures (p.130) in Night of Navy. Next, I taped my cardstock on my surface because I was gonna do watercoloring, and this will help prevent my paper from warping too much.

     For my watercoloring I used my Night of Navy re-inker and my Aqua Painter brush. I just colored the insides of my circles, creating shadows so that it looks kinda 3D. Very easy to do! Lastly for embellishment I decided to die cut the huge flower thinlit from Springtime Impressions Thinlits (p.129) out of gold foil sheet with the mutlipurpose adhesive sheet at the back for easy sticking. (This thinlit set is so beautiful, I could have made my entire display board using just these!)
     So after arranging my pictures and my sentiment piece from the Petal Passion Memories & More card pack, this is my finished scrapbook page. Admittedly, I had fun creating this page and creatively using my space...I thought it was a fun challenge. Maybe I will have to explore scrapbooking more in the future! 
     I loved this 3D look so much that I re-created it on a card too! And with that, I'll see you next time! Thanks so much for stopping by.

Monday, April 16, 2018

Colorful Background stamping

     So I have been so busy these past few weeks...First there was OnStage. And then afer OnStage, I got inspired to make a few changes in my craft room. By this, I mean a huge change...I decided to move my craft room altogether so I can have more space for all the awesome new stuff in our new catalogue! Now that was a huge project, but now I'm finally almost finished, just a few more tweaking. Pictures will be at the very end of this post.

     Now I wanted to move on and focus my attention on my Display Board samples. I'm gonna try to share one project a day (fingers crossed), and hopefully inspire you in using what supplies I received in my supplies box. So today I'll start with this colorful card I created. I love it because of all the vibrant colors in it, and because it was really easy to make too!
I just LOVE my light box, don't you?!?
It's the perfect addition to my craft room!

     To make this card, I used Whisper White for my base and for the layering 'art piece'. I used the circle stamps from the new Swirly Frames stamp set (p.137 in the catty) and clear heat embossed them all over my cardstock. Then I stamped my background using the Artisan Textures set (p.130) and the spritz-stamp technique (I don't know what the real name for this technique is, but basically you just ink up you stamp and spritz it with water to make it runny before stamping it on your paper. Makes for a watercolor-like effect!) For my background I used Tempting Turquoise, Lemon Lime Twist, Melon Mambo and Emerald Envy ink pads. Colorful, eh?
     
     Next I die-cut the feathers from the Chase Your Dreams Framelits (p.54) out of a Champagne foil sheet, and then just lightly sponged the edges with the Black Staz-On since I wasn't sure if our regular ink would stay on the foil. My sentiment is from the Birthday Blossoms stamp set, stamped with Basic Black ink and clear heat-embossed afterwards, then finally covered with Wink of Stella for some shimmer. 

     To complete my card I just added a few glitter enamel dots and a ribbon out of the silver baker's twine. And that is my colorful card! Simple to make but very eye-catching with all the vibrant colors!

     Now back to my new craft room, I moved from a basement bedroom and into our unused upstairs living room. So now I have lots of natural light for a change! So exciting! And my fur baby can hang out with me on the couch while I craft too, so win-win situation really. Here's a few pics...


     Still a work-in-progress, but at least I have most of my stuff in place now. Anyway thank you so much for stopping by today and I hope to see you next time! Cheers!