Sunday, March 24, 2019

Vintage-looking Needle & Thread

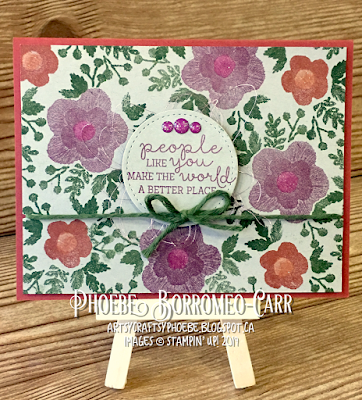
Today's card is a simple stamping project using the Needle & Thread stamp set. I ended up creating my own DSP using this set, with a vintage look to it. Here's what I made...
I created my DSP  background by stamping my images all over a piece of Crumb Cake cardstock (4" x 5 1/4"). I used Merry Merlot, Cajun Craze and Mossy Meadow ink pads for stamping. I then die-cut a circle piece of Crumb Cake cardstock using my Stitched Shapes framelits and stamped my sentiment on it using Merry Merlot. I added some Rose Metallic Thread at the back of my sentiment piece before adhering it onto my DSP piece using dimensionals. Lastly I wrapped a piece of Mossy Meadow twine (from the retired Festive Farmhouse collection) around my DSP piece and added a little bow before adhering it to my Cajun Craze card base (A2 size). 

For a little bit of shimmer (coz' I love my shimmer!) I just added some Wink of Stella on the centers of my flowers and then added some glitter enamel dots as well. And that is my super simple card for the day! Thanks for dropping by and see ya next time! Happy crafting!
Sunday, March 10, 2019

Shimmery Lovely Lattice

I have been playing around with my Lovely Lattice stamp set from Sale-a-bration, trying to find the best medium to color the beautiful image. I've tried my alcohol markers, watercolor pencils, even Brusho! Although these worked just fine, I just wasn't satisfied. I wanted something else...something different. Enter the shimmer paints!

Yes, I colored my image with shimmer paints! I love anything sparkly anyway, so this is the perfect solution. The images just popped with these paints, and I am very satisfied with the end result.
For my card I started by white heat-embossing my images on a piece of Night of Navy cardstock. Then I colored them in using my Aqua Painter and various shimmer paints (some are now retired): Frost White, Vegas Gold and Bright Copper. Once colored in I cut out my images. I also white heat-embossed my sentiment from the Rooted in Nature stamp set before fussy cutting it.
Next I ran a piece of Night of Navy cardstock (4" x 5 1/4") through my Big Shot with my Subtle embossing folder for added texture. I then wrapped a Silver Metallic Ribbon around my card before gluing down my images. I adhered my sentiment last using dimensionals. This whole piece was then added on to my Smoky Slate card base (A2 size) using more dimensionals, and added a few Pearl Basic Jewels for embellishment.

And that is my card for today, simple coloring for the gorgeous lattice image! Quick and easy, no shading needed, with maximum impact...gotta love that! I hope you guys liked today's project and thank you for stopping by today. Hope to see you next time, happy crafting!

Saturday, March 09, 2019

Sweet Hello Cupcake

Today I am inspired by Global Design Project's challenge of the week...sweeter than candy! This challenge gave me the chance to play with my Sale-a-bration item, the Hello Cupcake stamp set. Here's what I came up with...
Because of the theme for this challenge, I wanted to create a fun and playful card with lots of vibrant colors. And so for the cupcakes I used the following ink pads: Lovely Lipstick, Early Espresso, Bermuda Bay, Flirty Flamingo and Mango Melody. I stamped my cupcake and used my Aqua Painter to spread the ink out, and then fussy cut my images.
My circles are die-cut pieces using the Stitched Shapes Framelits and Mango Melody, Smoky Slate and Bermuda Bay cardstock

To put my card together I adhered a piece of the Share What You Love DSP on a piece of Whisper White cardstock (4 1/8" x 5 3/8"). Then I added my stitched circles and mounted my cupcakes using dimensionals. I wrapped a ribbon along the edge of my DSP and added a bow (I used a retired Bermuda Bay ribbon from past SAB). Next I added my cupcake topper by creating a banner using Flirty Flamingo cardstock and wrapping it around a toothpick. This whole card front was then adhered to my Whisper White card base (A2 size).

To finish off my card I added flowers to my cupcakes from the same stamp set, covered them with Wink of Stella for some shimmer, and topped them with Happiness Blooms enamel dots. I couldn't resist adding more shimmer to my card so I covered my cupcake topper with some Wink of Stella as well!

And that is my project for today, a sweet and playful birthday card. Hope you guys liked it. Thank you for stopping by today and hope to see you next time. Happy crafting!

Saturday, March 02, 2019

Easter Bunny

Are you a crafting hoarder like me? I do NOT like throwing crafty stuff away, and so I ended up with a lot of scraps! Today, I wanted to make use of some of these scraps and created this Easter card...
I used scrap pieces of cardstock in Pool Party, Coastal Cabana and Bermuda Bay.
Slathered glue on a piece of Whisper White cardstock and adhered my scrap pieces.
Trimmed my piece to 4" x 5 1//4" then ran through my Big Shot with the Dot to Dot embossing folder.
Sponged my embossed piece with the Frost White shimmer paint to mute my colors a little bit and at the same time add some sparkle.
I cut up notches at the top and bottom and wrapped my Whisper White Classic Weave Ribbon and layered the pretty Coastal Cabana ribbon from the Tea Room Ribbon combo pack.

Moving on to my bunny, I stamped my image from the Fable Friends set in Memento black ink on a scrap piece of Whisper White cardstock. After coloring my bunny, I cut it up using one of the oval dies in the Stitched Shapes Framelits. I then layered this piece on top of a bigger oval in Whisper White. Lastly I added my sentiment piece which is from the same stamp set.

This whole piece was then just adhered to my Whisper White card base (A2 size) using Foam adhesive strips for dimension. 

And that is how I created this simple and adorable Easter card! I think that the Dot to Dot embossing folder and the Fable Friends stamp set is such a perfect match! Hope you guys liked it and thanks again for stopping by today. See ya next time, happy crafting!